Showing posts with label wire wrapping techinques. Show all posts

Specialty Wire Working Tools

    In wire working there are some specialty tools that enable a designer to create something unique and unusual. There are the usual tools such as different pliers and cutting tool, but also special wire working tools to include wire twisters, coiling pliers, nylon jawed pliers (heavy), rosary pliers (heavy), and bail makers. You can find any of these online or through a vendor that carries special wire working tools.

     Wire Twisters (to the left): These unique tools are used to twist short to medium pieces of wire using just one hand. If you are going to be combining more than 2 pieces of wire, or a bunch of wire twists, than an electric hand drill will also perform the same purpose, only much quicker.

    Coiling Pliers (to the right): To make jump rings or wire loops, use coiling pliers that have one jaw that is flat and another that is in a 3-tier step making wire loops. This keeps you from marring your wire too much, as conventional convex/concave pliers can easily mar the wire as you turn loops or use as a bail maker.

    Nylon Lined Jaw Pliers (to the left): These pliers are used to straighten wire or for bending, forming and shaping your wire. The nylon lined jaws keep the pliers from again, marring your wire. As you work with these pliers, the nylon jaws will need to be replaced over time as they can get cut up by the raw wire. (Tip: If you don’t want to buy a set of these pliers, then using blue painters tape wrapped around the ends of regular pliers will do the same thing. You have to replace the tape after each use.)

    Rosary Pliers (to the right): These pliers are for working with every heavy gauge wire such as 14-16gauge. They are heavy pliers that are built not to slip when used in gripping, turning and twisting of the heavy gauge wire.
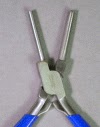

    Bail Makers (to the left): Bail making pliers are usually rounded diameter cylinder pliers and come in different sizes. You can purchase several different sets of bail makers as each one will usually make 3 different size combinations, usually ranging from 1.5mm to 9mm bail or ring sizes depending on the plier size you get.


    These are just a few of the specialty tools used in wire working. Doing research on the internet, reading books and magazines or taking a class you can learn about many other specialty tools used in wire working.

    Good luck and have fun wire working!

Working with Wire

    Wire work really adds to a necklace or earrings and is usually the backbone to a bracelet. I really like working with wire because it gives a freedom to bend and mold into different shapes, twist, links, cages, almost anything to touch of flare or spice in a piece I’m designing. It can be very fund but it means having patience (loads of it), a creative and imaginative mind and being able to ‘see’ your piece within the wire are the many talents and gifts of artists around the world.

    Wire is one of the essential supplies in my jewelry making business because it gives me the ability to take the jewelry beyond the normal beading limits. One of the questions I get asked regularly is do you know which is the right size and what material is best?
    At first when I started working with wire, it was difficult and it much of a ‘trial and error’ method and to some degree it still is when trying out new techniques or creating new designs. But what I do is that once I have down what I’m trying to do with wire, I then write down how I did it, which gauge works best and how much wire I used. You also need to look at durability, malleability, style, color and manufacturer when working with wire before designing.
    Wire is measured in gauges, from 16 all the way to 34; with 16 being the heaviest/thickest and 34 being the smallest/thinnest wires. Typically, the thicker the wire, the sturdier it will become. However, the type of material used for the wire also affects how flexible a particular gauge will be.

    Rules of Thumb
    *For bracelets, heavy necklace pendants designs or winding wire around very large beads, making charms or creating chain links, a 16 to 18 gauge is suggested.
    *Gauges 20 to 24 are considered medium to thin thickness and are good for wire wrapping beads, as well as for constructing findings, headpins, and ear wires. This is typically the gauge used for making earrings and 20 or 22 are the best for ear wires.
    *The smallest, skinniest wires are 26 to 34 gauges. They are easily manipulated and flexible, perfectly for use with small beads in embroidery and stitch projects.

    You can find wire in brass, copper, pewter, or artistic non-tarnish are inexpensive and typically soft wires to work with; while sterling silver and gold filled are more expensive and typically vary in hardness’s from dead-soft to half-hard.

    *Sterling Silver is great looking and made soft or hard. The only thing to remember is that silver will tarnish.
    *For wire that will not tarnish and will retain its beauty and luster, try working with non-tarnish wires; it is very inexpensive and usually made from a copper core; covered with silver, gold, or colored coating that has been treated so that it will not tarnish.

    *While the others run the spectrum of price; the most expensive wire to work with is gold or gold-filled, which does not tarnish. Some wire works will substitute gold-plated wire for cost effective designs.

    Whatever your choice for your design, you will find that working with wire brings out the artist and craftsman in every design.

    Browse our collections that incorporate metals including wire working on our website.

Wire Technique in Bails

    Though I’m no expert by any means; there are many different ways you can wire a bail. Whether you are using a cabochon, drilled or glass pendant, how someone finishes off the piece by making the bail will sometimes make or break a particular piece. I’ve learned many different styles of bails, incorporating my own little style into some of them as my own ‘added touch’. But in the mainstream, whatever you create, make sure it sets off the pendant or piece; rather the pendant will stand on its own or be incorporated into a necklace.

    Here is a simple bail to the right that many people call a ‘rabbit ears’ or ‘simple bail’ or ‘tv ears’; whatever your definitions, it’s how the bail is finished either with swirls, spirals, or whatever makes the pendant ‘pop’.


    This bail to the left, is a spin of the rabbit ears simple bail. All I have done is modify it a little and twisted wire back and forth between the ‘ears' to give it a textured look.


    With these two bails to the right, I learned it recently in a class with a national instructor. What I did was modify it slightly to be used with a coil instead of a graduated bail.

    On this last bail to the left, I simple used a regular pic-bail and highlighted it with large double coils. It really added to the piece and as an added bonus, it gave a large silver look near the bail and less ‘spacers’ were used.

    Learn from others, take their advice and expertise and create your own piece of art. It’s just a matter of letting your imagination run and creativities explode!

Wire Wrapping Techniques

    On some jewelry, lapidary and gem forums chatter has been wire techniques. I’ve been asked by several people lately from these forums what is exactly a wire wrapping technique.

    There is the traditional wire wrapping done mostly on the East coast, from what I’ve found of many wire wrappers. This is the Victorian style with big looping and swirls; most over-do the technique and end up overshadowing the gemstone.

    Another technique that is emerging on the West coast is more of a free style or form. This form of wire wrapping is being referred to by East coasters as ‘just wire holding’ and not even a real technique. The free form follows the form of the stone or just creates different corners to hold the stone among the wires.


    Emerging somewhere in-between is a very unusual technique, wire sculpture where the individual has really used their imagination and done a mix of many techniques; traditional, free form, and soldering. This is really more of a form of artwork and very intense.

    It really doesn’t really matter what type of technique you use, as long as you create something that is unique, a piece of art that you are proud of to share with everyone else!

Blog Archive